A jacket zipper suddenly refuses to budge, your favorite backpack gags on its teeth, or a tent fly opens to the elements. Few things are as frustrating as a broken zipper, yet the solution often feels shrouded in mystery. The good news? With the right tools and supplies for zipper repair, most common zipper woes are surprisingly fixable, saving you money, time, and the hassle of replacing an otherwise perfectly good item. Forget struggling with makeshift solutions; let's equip you to tackle these repairs with confidence and precision.
At a Glance: Your Zipper Repair Essentials
- Problem-First Approach: Identify what broke (slider, teeth, pull, stops) before buying.
- Kit Diversity: Kits range from small, instant fixes to large, comprehensive sets.
- Universal vs. Specific: Many kits are "universal," but specific sizes (#3, #5, #8) are crucial for an exact fit.
- Key Components: Sliders, pulls, top/bottom stops, and sometimes insertion pins are most common.
- Essential Tools: Zipper pliers, a seam ripper, and sturdy tweezers make repairs much easier.
- No-Sew Options Exist: Look for "instant" or "no-sew" solutions for quick fixes, especially for sliders.
The Anatomy of a Zipper Problem: Knowing What You're Up Against
Before you dive into buying every tool under the sun, let's play detective. A successful zipper repair starts with accurately diagnosing the problem. Is it a:
- Broken Slider? The most common culprit. It either won't move, has lost its ability to mesh the teeth, or has simply come off.
- Missing or Damaged Teeth? This is often a trickier fix, sometimes requiring more advanced techniques or a full zipper replacement.
- Detached Pull Tab? An easy fix! Often just needs a new pull or a simple keyring.
- Missing Top or Bottom Stop? If the slider comes off the track entirely, it's likely a missing stop at either end.
- Fabric Caught/Torn? Sometimes the zipper itself is fine, but the surrounding fabric is damaged, preventing smooth operation.
- Retainer Box or Insertion Pin Issue (Double-Open Zippers)? For jackets that open from both ends, these bottom components can bend or break, making it impossible to start the zipper.
Once you know the specific ailment, you can gather the right tools and supplies for zipper repair.
Your Zipper Repair Arsenal: Essential Tools & Gadgets
While some "no-sew" kits boast tool-free installation, having a few specialized items in your kit will dramatically improve your repair success rate and make the process far less frustrating. Think of these as your trusty mechanics for tiny teeth and stubborn sliders.
1. Zipper Pliers (Often Called Zipper Installation Pliers)
These aren't your average pliers. Zipper pliers are specifically designed to:
- Remove and Install Zipper Stops: They have a flat, gentle grip to press new top and bottom stops onto the zipper tape without damaging the fabric or teeth.
- Adjust Slider Tension: Sometimes a slider isn't broken, just a little too wide. These pliers can gently crimp the slider's "jaws" to restore its grip on the teeth. Pro Tip: Use with extreme caution, a little goes a long way, and too much pressure can permanently damage the slider.
- Work with Retainer Boxes: For double-open zippers, they can help manipulate the retainer box and insertion pin.
Investing in a good pair of zipper pliers, often included in larger tools and supplies for zipper repair kits, is a game-changer for precise, damage-free work.
2. Seam Ripper
A small but mighty tool! This sharp, hook-ended gadget is indispensable for:
- Accessing Zipper Ends: You'll often need to remove a few stitches to access the top or bottom stops of a zipper, or to replace a slider. A seam ripper makes quick work of this without damaging the surrounding material.
- Removing Old Stops: Gently prying off old, crimped stops without tearing the fabric.
- Clearing Snags: Carefully freeing fabric caught in a zipper.
3. Fine-Point Tweezers
Perfect for those intricate, fiddly bits. Tweezers are excellent for:
- Handling Small Components: Picking up tiny zipper stops, insertion pins, or pull tabs.
- Guiding Zipper Teeth: Helping to realign or guide stubborn zipper teeth.
- Removing Thread Snippets: After using a seam ripper, tweezers can pick out loose threads.
4. Small Scissors or Thread Snips
A sharp pair of small scissors is essential for:
- Trimming Excess Thread: After sewing on new stops or mending fabric.
- Cutting Zipper Tape: If you're replacing a section of zipper or using zipper-by-the-meter.
5. Fabric Glue or Fray Check (Optional but Recommended)
For minor fabric tears near the zipper or to secure thread ends, a dab of fabric glue or Fray Check can prevent further unraveling and reinforce your repair.
Deciphering Zipper Repair Kits: Components & Compatibility
Once you have your basic tools, it's time to consider the actual supplies for zipper repair – the replacement parts themselves. Zipper repair kits come in a bewildering array of sizes and contents, but understanding a few key concepts will help you choose wisely.
What's Inside a Zipper Repair Kit?
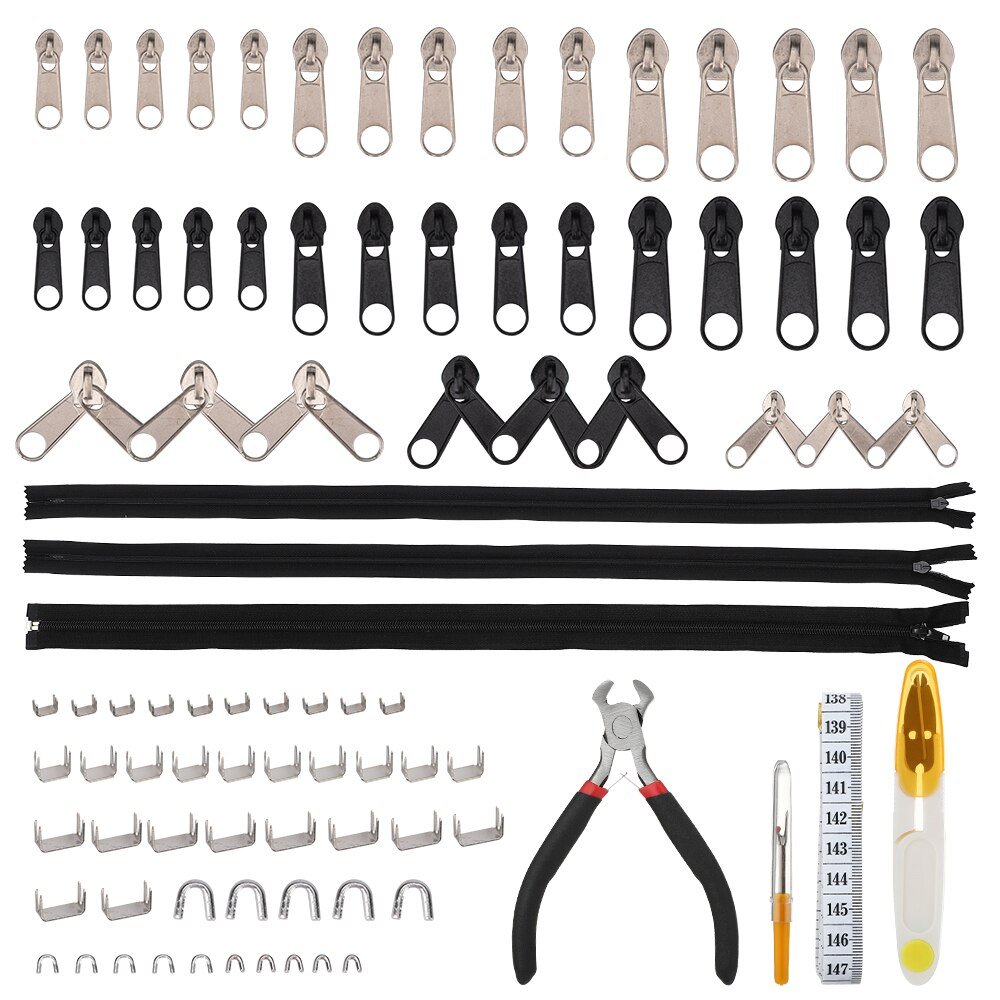
Comprehensive kits are the true treasure chests of zipper repair. They typically offer a mix of:
- Zipper Sliders: These are the most frequently replaced part. Kits often contain multiple sizes (#3, #5, #7, #8, #10 are common) and types, compatible with coil, plastic, and sometimes metal teeth. You'll find options in metal (brass, titanium, various alloys) and plastic.
- Zipper Pull Tabs: The little handle you grip to move the slider. These can be detachable, heavy-duty titanium, or simple rings. Many kits focus on just sliders and clips for convenience.
- Top Stops: Small metal or plastic clips that crimp onto the top of the zipper tape to prevent the slider from coming off.
- Bottom Stops: Similar to top stops but larger, crimped at the bottom of a jacket or bag zipper to hold the two sides together.
- Insertion Pins and Retainer Boxes: Specifically for double-open (jacket-style) zippers, these crucial components allow the zipper to "start" at the bottom. Some kits specialize in these parts.
- Complete Zippers by the Meter: Larger, more advanced kits might include a length of zipper coil (e.g., 14m of nylon zipper) along with a supply of sliders, allowing you to create custom-length zippers.
- Specialized Components: Anti-theft zipper clips, heavy-duty pulls, or decorative pulls.
Understanding Zipper Sizes: The #3, #5, #10 Dilemma
This is where many people get tripped up. Zipper sizes (like #3, #5, #8, #10) refer to the width of the zipper teeth, not the length of the zipper.
- #3 (Small): Common on pants, dresses, small pouches, some backpacks.
- #5 (Medium): The most common size for jackets, purses, luggage, and larger backpacks.
- #7, #8, #10 (Large/Heavy-Duty): Found on tents, sleeping bags, heavy coats, boat covers, and industrial applications.
Crucial Tip: To determine your zipper size, look for a number stamped on the back of the slider. If there's no number, you'll need to measure the width of the zipper teeth (when closed) in millimeters. A #5 zipper, for instance, has teeth that are about 5mm wide.
Universal vs. Specificity: What to Choose?
- Universal Zipper Repair Kits: These kits typically include a variety of "instant" or "clip-on" sliders designed to fit a range of common zipper sizes without needing to remove existing stops or do any sewing. They're great for quick fixes on a variety of items like jackets, bags, and luggage. However, their universal nature sometimes means they don't offer the perfect, long-lasting fit of a properly sized replacement.
- Specific Size Kits: These provide sliders, stops, and pulls for particular sizes (e.g., a "Size #5 Zipper Repair Kit"). They often require removing old stops and crimping on new ones with pliers but result in a more durable, factory-like repair.
- Assorted Kits: Many large tools and supplies for zipper repair kits will offer a mix of sizes (small, medium, large) and types, giving you the most versatility for tackling different projects. These are ideal if you frequently repair various items.
Materials Matter: Metal, Plastic, Nylon
The material of your replacement parts should ideally match the original or be an upgrade.
- Metal (Brass, Titanium, Alloy): Generally the most durable and often preferred for heavy-duty items like luggage, jackets, and outdoor gear. Brass offers good corrosion resistance, while titanium is exceptionally strong and lightweight.
- Plastic/Nylon: Common for clothing, lightweight bags, and tents. While durable, plastic sliders can sometimes be less robust than metal ones under heavy use. Many universal sliders are made of plastic for flexibility.
- Polypropylene: Another common material for pulls and sometimes for plastic zipper teeth.
Color options are also plentiful, with black, silver, gold, and mixed color assortments readily available to match your gear.
Choosing Your Zipper Repair Solution: Key Considerations
With so many options for tools and supplies for zipper repair, how do you pick the right kit? Here's a decision-making framework:
1. Identify the Exact Problem & Zipper Type
- What needs fixing? (Slider? Pull? Stop? Teeth?)
- What type of zipper? (Coil, plastic molded, metal? Single-pull, double-pull? Open-end, closed-end?)
- What size is it? (Crucial! Measure if you can't find a number.)
2. Consider the Item's Value & Intended Use
- Everyday wear vs. High-Performance Gear: A quick, universal clip-on slider might be fine for a casual hoodie. But for a waterproof outdoor jacket, a properly installed, size-specific metal slider is essential for durability and function.
- Sentimental Value: If it's a cherished item, investing in a comprehensive kit and taking your time will be worth it.
- Frequency of Use: An item used daily (like a backpack or main jacket) warrants a more robust, long-lasting repair.
3. Your DIY Comfort Level
- "No Tools/No Sewing" Kits: Ideal for beginners or those seeking the quickest fix. They typically involve clip-on sliders that can be installed in seconds.
- Comprehensive Kits with Tools: For those willing to learn a few basic techniques (like using zipper pliers and a seam ripper), these offer a more permanent and professional-looking repair. This is where you really start to leverage the full potential of your zipper repair skills.
4. Quantity and Variety
- One-Off Repair: A small pack of 2-6 instant sliders or a single-size kit might suffice.
- Multiple Repairs/Household Use: A large assortment of 85, 97, 182, or even 252 pieces is fantastic value, ensuring you have the right part on hand for future issues with various items like luggage, coats, and even jeans.
5. Material Preferences
- If your original slider was metal, replacing it with another metal slider is usually best.
- For lighter items, plastic or nylon replacements are perfectly suitable.
Beyond the Basics: Advanced Kits and Specialized Solutions
Sometimes, a standard kit isn't quite enough. For more complex scenarios, specialized tools and supplies for zipper repair step up to the plate.
- Heavy-Duty Titanium Pulls: If you consistently break pull tabs on a frequently used bag or piece of gear, consider upgrading to titanium for extreme durability.
- Anti-Theft Zipper Clips: These small clips can link two zipper pulls together or secure a single pull to a D-ring, deterring quick access – great for travel luggage or backpacks.
- Retainer & Insertion Pin Kits (for Double-Open Zippers): If you specifically have issues with the bottom components of two-way separating zippers (common on jackets), dedicated kits with these parts will be a lifesaver. These are often harder to source individually.
- Zipper-by-the-Meter with Sliders: For serious DIYers or those needing to replace very long zippers (e.g., on tents or sleeping bags), buying continuous zipper coil with a bulk pack of sliders is the most cost-effective and versatile option. You cut to length and install the stops and sliders yourself.
Common Pitfalls and How to Avoid Them
Even with the best tools and supplies for zipper repair, things can go sideways. Here's how to prevent common headaches:
- Mismatching Sizes: The number one mistake. Always measure or check the existing slider's size. A #5 slider won't work on a #3 zipper.
- Forcing Components: If a slider isn't going on smoothly, or a stop isn't crimping, stop and reassess. Forcing can damage the zipper tape, teeth, or the new component.
- Over-Crimping Sliders/Stops: When using pliers, apply gentle, even pressure. Over-crimping a slider can bind it, and over-crimping a stop can tear the fabric.
- Not Addressing the Root Cause: If a zipper keeps breaking in the same spot, there might be an underlying issue like worn fabric, a misaligned track, or excessive tension on the zipper. A simple component replacement might not be enough.
- Ignoring Fabric Health: If the fabric around the zipper is frayed or torn, even a perfect repair won't last. Mend the fabric first, or consider a full zipper replacement.
Empowering Your Next Repair
Armed with the right tools and supplies for zipper repair, you're no longer at the mercy of a broken zip. From the simplest detached pull to a stubborn slider, you now have the knowledge to diagnose the problem, select the appropriate kit, and execute a fix. This ability not only saves money but also extends the life of your favorite items, reducing waste and fostering a more resourceful mindset. So go ahead, open that zipper repair kit, and bring your beloved gear back to life!